Showing posts with label tutorial הדרכה. Show all posts

Saturday, December 23, 2017

Follow Your Dreams - Maja Design and Lindy's Stamp Gang

Hello crafty friends,

Today I want to share with you a wintery layout I've made for several challenges. I've also made a video tutorial, so make sure you scroll all the way down.
Here are some close-ups:


The inspiration moodboard at Lindy's this month, has two options - one is a traditional Christmas colors, and the other is the combination of blue with either silver or gold. 
Blue with gold is very royal, while blue with silver is very wintery. I went on the wintery option, with a photo of my youngest a few years ago, playing in the snow.
Lindy's Gang products that I've used:
embossing powders: cosmic blue violet, desert moon turqouise.

I was also inspired by the moodboard at Maja Design:
Blue, cream, brown is one of my all time fav color combo. I've used papers from the Denim & Friends collection, along with Vintage Romance 6x6 paper pad and Vintage Autumn 6x6 paper pad.
The chipboard frame is Scrapiniec. I would like to enter this lo also for the following challenges:
Mixed Media & Art, with this magical snowy/wintery moodboard:
I was inspired by the snow theme and the colors of white, blue, brown and gray/silver.
Scrapki-Wyzwaniowo, which gave the theme of 'splashes'. 
Well, there're lots of splashes on my layout :).
Anything mixed media - Creative Artiste. And the last, but not the least, Creative Embellishments with this wintery moodboard:
I was inspired by the blue color and the snowflakes. The twist was to use a border, so I tore the dark dp diagonally and made a border :).

As promised, here's my tutorial of 'how to' for this layout:
Thank you for stopping by. I appreciate your comments very much. 
Merry Christmas to you and yours.

Saturday, November 25, 2017

A tutorial how to make a small gift box

This is a tutorial how to make a small gift box from one cardstock and 6x6 paper pad.
I've used Echo Park 'A perfect Autumn' 6x6 paper pad for these two lovely boxes.
Here's a link to my video how to:
I hope you'll enjoy my tutorial and if you use it, please give me a credit.
Thank you for visiting my blog. Your comments are much appreciated.

Saturday, September 2, 2017

Natural Beauty - my September Counterfeit Kit

I've missed playing with the Counterfeit Kit Challenge. I love the concept of this blog - use your own stash to mimic a kit provided by one of the kit clubs the inspiration kit.
For those of you who are not familiar with this blog - I highly recomend that you pop over. Not only there ton of inspiration by the DT's and the Guest Designers, but they also provide you with tips and tricks to make your own items for your kit.
This month the inspiration kit is September 2016 Studio Calico - 'Lost River Kit':
I was inspired by the colors, the natural feeling and some of the patterns, and this is what I came up with - 'Natural Beauty' kit:
CS and DP:


Embellishments:
I've made my own faux printed washi tape:
It's super easy to make them, and here's a video of how to:
All put together, so it's easy for me to grab what I need while working on a project:

 Alphas, word stickers and stamps:

The inspiration kit had also a documenter kit:
I was inspired with the bold colors, in contrast with the soft colors of the main kit, so I've made an 'add on' kit, with some scraps of papers, and more embellies and stamps - 'Natural Beauty add on kit':

I wanted to add some more sequins, but couldn'd find my seaqins bag, so I just might put some more of them once I find them LOL.
I didn't put inks and mists to my kit, as I use them on a regular basis, according to what I'm working on.
Since the Jewish New Year is just around the corner, I've put some stamped labels with blessing for the new year. I'm plannig to make some new year cards.
I really can't wait to start working with my new kit!

Saturday, November 27, 2010

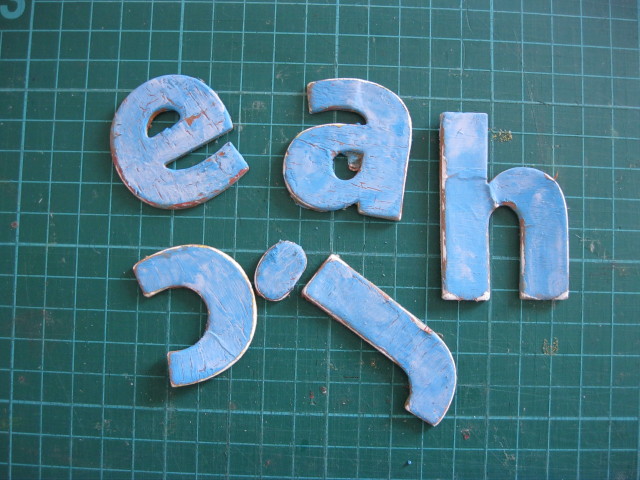
Crackled Chipboard Alphabets - A Tutorial for Sketches In Thyme


Today I want to share with you a little trick, how to make those crackled
chipboard alphabeths.

This a tutorial I've made for Sketches In Thyme (so if you've already read it over there, you don't really have to read it once again.. LOL).

 A fair notice - it's gonna be very messy.

You'll need:


  1. Alphabet chipboards (mine were GCD's).
  2. Acrylic paints - in two contrasting colors. You'll need to decide which of the colors you wish to be on surface and which one will be the 'crackled' one, to reveal from underneath.
  3. Carpenters' wood glue (I used Elmer's).
  4. A brush.
Step one:


Paint your alphabets chipboards with the first color (the one to show out from the cracks). Let it dry completely.

Step 2:


Spread the carpenters' wood glue on the painted chipbords. Let it dry completely.

Step 3:

Paint the dried alphabets with the second color. Make sure you're painting on the same direction you spread the carpenters' wood glue, so the cracks will show better (I forgot, and that's why my blue alphabets aren't the best. but look at the cream ones, they're much better!). Did I already mention you need to let it dry completely? Well, please do so.... (yea, I forgot to write down "patience" in the ingredients list...).

Step 4:


Now you can see the cracks starting to appear! (I added some white acrylic paint, to give a cloudy look, but it's not necessary).
That's it!!

Here are the full layouts with the crackled alphabets:


So how about giving it a try? We'd love to see it, so if you do use this technique, please live us a comment with a link to your creation, so we'll be able to pop over and leave you some love!
Have a lovely weekend!

הדרכה שהכנתי לאתר של Sketches In Thyme על איך להכין אותיות צ'יפבורד עם אפקט הקרקל ("פיצוצים"). ההכנה פשוטה מאד, אם כי צריך זמן וסבלנות (לייבוש בין השלבים השונים). האפקט שמתקבל הוא בעיני מאד יפה - משתלב נהדר עם דפים וינטאג'יים או בסגנון ישן, עם מראה של דיסטרסינג.

תודה על תשומת הלב :).

Tuesday, November 9, 2010

לכסות טפח ולגלות טפחיים Hide the undesired


For the English part, please scroll down. thank you!

כשהסתכלתי בדפים שהכנתי לאחרונה, ראיתי שחוזר בהם מאפיין די בולט - שימוש בטכניקות שונות כדי להסתיר חלקים לא רצויים/מיותרים בתמונה.  רציתי לשתף אתכן בשלוש טכניקות: קריעה, קירצוף וצביעה, והדבקת תמונה אחרת או קישוט שמסתיר.
אם הפוסט הזה יעורר אצלכן השראה או רעיונות נוספים, אני אשמח מאד אם תשאירו תגובה בפוסט, עם לינק לבלוג שלכן, שאוכל לקפוץ ולראות את האופן שבו אתן מסתירות את החלקים הבלתי רצויים בתמונות.


When I looked at some of the layouts I made lately, I noticed that there's something in common for all of them - I used different techniques to hide undesired parts of the photos.
I wanted to share with you those techniques.

The first one - tearing
This is the original photo: 
I didn't like all the dark area on the left upper portion of the photo, so I just tore it... And this is how it looks on the lo:


Naturally, tearing works great with vintage/shabby look, like on this lo.

The second one - scrub & paint

This is the original photo:


You see the completely strangers on both sides of the photo? I didn't want them to be part of my intimate family lo, so I just scrubbed them and then painted with white acrylic paint over them. Then I put flowers on one side and stamped journaling blocks on the other side.

Here are those parts on the lo:


And this is how the finished lo looks:


The third one - attach an image/embellishment  or another photo. For this one I want to show you two examples:
This is the original photo:


I didn't want the bunch of people on the background and the black bag on the front - to show on my lo, so on the undesired bunch I put another small photo, and on the bag - a journaling spot (a chipboard). This is the relevant part:


And this is the finished lo:


See how those undesired parts just disappeared?

and the second example-

here is the original photo:


Eventhough I cropped the photo to my desired size, I still had a lot of 'white space', which I didn't like, so I attached the mushroom image, paper pieced, to fill in that 'white space'.

This is the relevant part of the lo:
  

And this is the finished lo:


I hope you find my post useful for you, and if so - please leave me a comment on this post, with a link  to your blog. I'd love to see your interpretation and way to hide those undesired parts of your photos.

Thanks for stopping by!