Showing posts with label dryer sheets flowers. Show all posts

Sunday, April 22, 2012

Icecream? - a lo

This my take on Artful Delight's April sketch, and it's my 8th layout from my counterfeit kit.
Here's the sketch:
The photo is of my eldest, eating an icecream 6 years ago. Not like the rest of our family, he doesn't like iceream (I know it's strange... it's a kind of a joke in our family), so seeing him eating iceream with such a delight is very unique, and that's what the journaling says.
All the supplies are from my April's counterfeit kit.
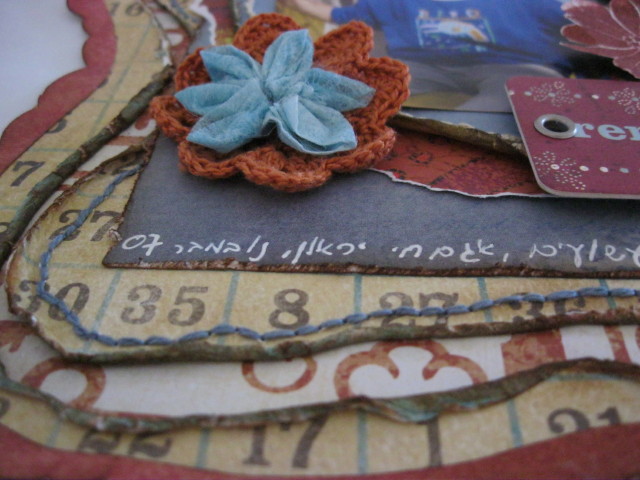
Here are some close-ups on the details:


The flower is my dryer sheet flower (here's the tutorial I've made), so I have some recycle here too.
challenges:
homemade flowers - hiding in my craft room
recycle - sisterhood of crafters
Thank you for stopping by!
דף שמיני מקיט החיקוי. הבכור, בשונה מיתר בני המשפחה, לא כל כך אוהב גלידה. אני יודעת שזה מפתיע ואף מוזר, אבל כך הוא. תמונה שלו, מלקק להנאתו ארטיק, היא בהחלט פוזה די נדירה. שווה הנצחה גם בתמונה וגם בדף מעוצב.
הצבעים של הדף הזה הזכירו לי ממילא צבעי גלידה :), כך זה עם צבעים אביביים.
הפרח הוא מדף מייבש כביסה, והנה ההדרכה שהכנתי איך להכין אותו.
תודה על תשומת הלב!

Saturday, April 7, 2012

two versions of dryer sheet flowers

Long time ago, I've made a tutorial about making flowers from a dryer sheet - here. Today I want to show you another versions of dryer sheet flowers.
supplies:
used dryer sheet
needle and thread
glimmer mist/ distress inks/ acrylic paint - any medium you wish to color the dryer sheet
a pencil
scissors
a circluar template (I use chipboard, punched cs, etc)
step 1:
fold the dreyr sheet into half and then again into half (if you're using a bigger circle, fold it only once).
step 2:
using the pencil, draw a circle on the folded dryer sheet. that's what you'll get:

step 3:
Cut the circle with the scissors. you'll get 8 circles.
step 4:


 Color 5-6 circles (depending on how much petals you want for your flower). in my example, the red one was misted with glimmer mist and for the blue one I used distress ink.
step 4:
version 1 5 pointed petals flower -

fold the circle in half, and then bring one end to the center of the half circle.
step 5:
with a needle and thread, make stitches on the round edge, pulling the thread.
step 6:

do the same to the other 4 circles, and gather them tightly, to preform the 5 petals flower look.
secure the thread, and that's what you'll end up with:
2nd version - 6 rounded petals flower:
fold the circle in half.
stitch the rounded edge, and gather all 6 petals the same way. 
that's what you should end up with:
embellish the center for your flower with a pearl, a button, a brad, etc.
here are my two versions, side by side:


Do you like it? give it a try. it's very easy and you get to recycle. If you use my tutorial, please credit me with a link to this post, and leave me a comment with a link to your project, so I'll be able to come and leave you some love.
Thank you for stopping by!
גרסה נוספת לפרחים מנייר של מייבש כביסה, עם שתי אפשרויות למראה של עלי הכותרת - מחודדים או מעוגלים.
גוזרים עיגולים מנייר משומש של מייבש כביסה (לפרח עם עלי כותרת מחודדים צריך 5, ולפרח עם עלי כותרת מעוגלים צריך 6 עיגולים). הדרך הנוחה ביותר, מבחינתי, היא לקפל את הנייר לחצי ואח"כ שוב לחצי (או גדול יותר אם העיגול שאתן גוזרות גדול יותר), ואז לגזור. כך מתקבלים 8 עיגולים שווים בגזירה אחת.
עכשיו מגיע השלב להתלכלך.... אפשר לצבוע את הניירות הללו בדרכים שונות. בדוגמא כאן הראיתי צביעה בהתזה של גלימר מיסט וצביעה עם דיו דיסטרס (אפשר, כמובן, בדרכים נוספות - צבעים אקריליים, לדוגמא).
לפרח מחודד עלי כותרת - כל עיגול מקפלים לחצי, ואז מביאים קצה אחד אל האמצע של העיקול המקופל (בתמונה זה די ברור). תופרים תפרים בחלק העגול של העיגול המקופל ומכווצים. כך עושים עם עוד 4 עיגולים ומהדקים את כולם בתפירה, כך שהם צמודים זה לזה ובסגירתם יוצרים צורה של פרח עם 5 עלי כותרת - כולם מחודדים.
לפרח מעוגל עלי כותרת - כל עיגול מקפלים רק לחצי וממשיכים באותה צורה.
את מרכז הפרח אפשר לקשט במגוון קישוטים - פנינה, כפתור, סיכה מתפצלת וכיוצ"ב.
מה דעתכן? מוצא חן בעיניכן? אשמח לקרוא את תגובותיכן.
אני גם אוהבת את המראה וגם מרוצה מהעובדה שאני עושה משהו קטן למיחזור חומרים שאחרת היו נזרקים לפח.
אם תעשו שימוש בהדרכה הזאת, אשמח אם תתנו לינק לפוסט הזה. בכל מקרה, אם תשתמשו בהדרכה,  אנא השאירו לי תגובה עם לינק לפרוייקט שלכן, אשמח מאד לראות תוצרים!
תודה רבה על תשומת הלב!

Monday, November 28, 2011

A Wonderful Day lo


As soon as I saw #86 palette at The Color Room, I new right away what photo I want to scrap for the palette. Here's the palette:

The photo is of my boys, 4 years ago, at a playground. We were on our way for a weekend with friends and stopped at that park, whith small zoo. After walking in the zoo, the boys played at the playground untill it was time to move on.  The grungy look of that playground, along with my kids cloths, go perfectly with this palette. So I grabbed the matching cs, dp and embellishments.
I was inspired by two beautiful sketches - #184 Creative Scrappers and #261 Pencil Lines.
I mixed and matched different companies here - DCWV, MME, Glitz, Miss Elizabeth, Stamperia. I also mixed different kinds of flowers - fussy cutiing, stamped, crochet. rolled flowers and dryer sheet flowers.
I distressed all edges and inked them and did some handstitching. Rusty alphas and a chipboard with matching colors and great sentiment completed the overall look.
Here are some close-ups:


I would like to enter it to the following challenges:
photo inspiration - the paper variety, with this photo:
another photo inspiration - for your inspiration, with this photo :
(I was inspired by the colors, of course)
"D" - scrapbookers anonymous (mine are DCWV and distressing)
Thank you for taking the time and visiting my blog. Your comments are much appreciated!

דף לאתגר צבעים ב-The ColorRoom. אני מאד אוהבת את האתר הזה, כי הוא מביא שילובי צבעים שלא הייתי יוצרת בעצמי, ולפעמים הם מאד מאתגרים עבורי. כשראיתי את השילוב הנוכחי, היה לי מייד ברור באיזו תמונה אשתמש, תמונה של הילדים משחקים בגן המשחקים באגם חי ביראון, לפי כ-4 שנים, כשהיינו בדרכנו לטיול עם חברים בצפון.
הצבעים המהוהים/חלודים של המתקנים בגן השעשועים, ביחד עם הבגדים שלבשו הילדים, התאימו לי מאד לשילוב הצבעים של האתגר.
לעיצוב עצמו השתמשתי בשתי סקיצות, שדומות מאד אחת לשניה. שילבתי בין קארדסטוקים וניירות מדוגמים של הרבה חברות - DCWV, MME, GLITZ, MISS ELIZABETH. שילוב נוסף הוא בין סוגי פרחים שונים - גזורים מדף מדוגם, מוחתמים, פרחי קרושה, פרחים מקופלים ופרחים מנייר של מייבש כביסה. הרבה תפירה ידנית ועוד יותר הרבה יישון של הדפים כולם. אותיות סול מנצנצות בצבע ארד/חלודה וצ'יפבורד בצבעים תואמים - השלימו את המראה הכולל.

תודה על תשומת הלב!

Saturday, January 1, 2011

Snow all over my city - lo שלג על עירי


This lo was done for the challenge at Let's get shabby. The challenge is about architecture, and here's the photo inspiration:


The minute I saw that photo, I knew exactly what photos I wish to scrap for this challenge - photos from snowy Jerusalem, 19 years ago (Feb 1992, to be exact...).  The photo inspired me with the combination of an old architecture with all the greens around it, just like the photo on the bottom of my lo.
I love that photo  very much, especially cause of the contrast between the frozen look of the snow, and the warm colors and atmosphere from the building, the foliage all over the wall, and especially - the warm yellow light from the door lamp.
Hence the dp, all in warm brown and cream colors, with a little touch of red. I cut the flowers on the dp to slide the photos underneath. I stamped this "wall bricks" with simple office stickers and distress ink.

I also added some gold and red stickles to the flowers and leaves, and some Prima flowers that I inked a little. Here are some close-ups on the glitter touches, the wall and the flower made out of dryer sheet:


I just love how it turned out.

Thank you for taking the time and visiting my blog!

דף שהכנתי לאתגר של ארכיטקטורה עם תמונה להשראה. כשראיתי את התמונה היה ברור לי מהן התמונות שאני רוצה לעבוד עליהן לאתגר הזה.
התמונות הללו צולמו לפני 19 שנים, בפברואר 1992, בזמן השלג הגדול שהיה בירושלים. להסתכל עליהן כיום זה כמעט לעג לרש... יש לי כמה וכמה תמונות מירושלים המושלגת של אז, אבל התמונה התחתונה היא האהובה עלי ביותר - פינה במשכנות שאננים, עם הצצה לעבר העיר העתיקה. אני מאד אוהבת את התמונה הזאת, בין היתר בגלל הניגודיות שבין המראה הקפוא של השלג הלבן, לבין החמימות שישנה באבנים של הבנין, הצמחיה שעליו ובמיוחד - האור הצהבהב החמים של מנורת הכניסה. לכן הייתה גם הבחירה בדף המדוגם הזה, עם צבעי החום העדינים, הקרם והנגיעות הקלות של האדמדם.

חתכתי את הפרחים בדף כדי להכניס את התמונות מתחת, כך שהפרחים יוצרים מעין מסגרת לתמונות, בנוסף למסגרת החיצונית שבדוגמת הדף. הוספתי נצנצים זהובים ואדמדמים על הפרחים והעלים, וכמה פרחי פרימה ופרח שהוכן מנייר של מייבש כביסה. את "חומת האבנים" שמתחת לכותרת, יצרתי על ידי החתמה פשוטה של סטיקרים משרדיים עם דיו דיסטרס. אני מאד אוהבת את התוצאה. האותיות הן, כמובן, "תוצרת הארץ". בהתחלה שמתי אותיות לבנות, אבל הן נבלעו לגמרי ברקע, וגם קצת יישון בדיו לא עזר, אז הלכתי על ניגוד מוחלט עם אותיות חומות.

תודה על תשומת הלב :)). השבת החורפית הזו ממש נעימה וכיפית (למעט העובדה שהבן הגדול שלי חולה מאתמול, אבל הוא מהסוג של חולים קלים, למרבה המזל).