Monday, February 7, 2011

We'll always have Paris - mini album


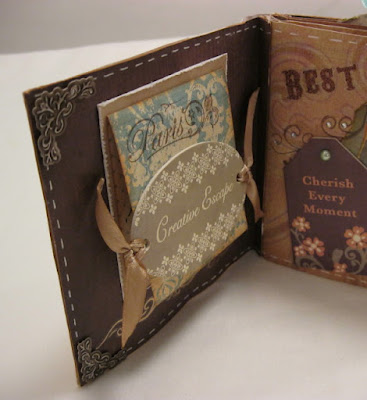
I've made this mini album about a wonderful vacation I had with my BF in Paris,  on July 2009. It was a very spontaneous decision to go (two days ahead) , and against all chances - my passport was invalid and it was almost impossible to get a new one within only one day, plus my youngest had fever the night before I left). It was on of my best vacations and we had such a great time! I just love Paris....

The mini album is in the vintage style, of course, and I used a lot of distressing, tearing and inking (my fingers were all inked :)))...). There are tags, hidden journaling, stamps, rhienstones, rub-ons, chipboards, charms, stickers, perals and ribbons. But strangely  - no lace.. I just realized it when it was all finished.

In order to give it the look of a book, I used accordion folding, and then I adhered every two pages into the folds:


Please join me to a little tour in this oh so beautiful city. And while you're looking at my mini album, why not enjoy this oh so wonderful song, by Malcolm Maclaren, called "Jazz is Paris":


And here are my pages:


I loved making this one, it was like going back to Paris (how I wish I could...).

Challenges:
stitching - tuesday throwdown
show some love - simon says stamp and show (for me, Paris is the ultimate for love and romance)
you choose your challenge ( I chose 'distressing' - #22;  and  'charm it' - #33) - odbd
fancy folds - meljen's designs
jewllery - creativebelli (mine are pearls and rhinesotns)

Thank you for stopping by and visiting my blog!

מיני אלבום שהכנתי על חופשה בפריז, עם החברה הכי טובה שלי, לפני כשנה וחצי. בחרתי, כמובן, במראה הוינטאג'י. יש באלבום תגיות נשלפות וכיתובים נסתרים. השתמשתי במדבקות מתגרדות, חותמות, בלינגים, פנינים, סטיקרים, סרטים וצ'יפבורדים. קרעתי ויישנתי דפים ותמונות,  ובכדי ליצור מראה של ספר, עשיתי קיפולי אקורדיון ואת הדפים עם התמונות הדבקתי לתוך הקיפולים.  להכין את האלבומון הזה היה כיף גדול מאד, כאילו לצאת שוב לטיול הזה.

תודה על תשומת הלב!

Friday, February 4, 2011

An Exploding Box - Tutorial


I'm so late posting this tutorial only today! I've made it as my DT's assignment at Frosted Designs last Sunday, but I had a very busy week at work, and I just didn't find the time, nor
the energy, to post it here.

Okay, lets get on with the tutorial...

Materials:


1. 3 heavy wheight dp/cs, sizes: 12x12, 11.25x11.25, 10.5x10.5 (in cm - 30x30, 28.8x28.8, 27.9x27.9)
2. solid cs in coorinating color size 6.75x6.75 (in cm - 16.5x16.5)
3. a trimmer or a metal ruller and a crafting knife.
4. scoring tool (bone folder or something like that)
5. scissors
6. a pencil
7. adhesives (double sided tape, likuid glue)
8. optional - distress inks, corner punch
9. photos (abotu 12-20 photos, or less if you choose to leave some of the squares without photos)
10. embellishments

Step one:


On the 12x12 pp mark 4" from each edge (in cm - 10 cm from each edge). Draw lines and score along the lines.
Do the same for the other pp - mark 3.75" from each side for the 11.25x11.25 pp (in cm - 9.6 cm from each end), and 3.5" from each side for the 10.5x10.5 pp (in cm - 9.3 cm from each end).

Step 2:
Cut out the outer squares on all 3 dp. You should end up with 3 cross shaped dp like this:


Step 3:
Adhere the cuts on the back white side of each square:


This is what you should get (I also ahered a solid cs on the inner square of the smallest dp):


Step 4 - make the lid:
Mark lines 1.25" from each end and score along the lines. This is what you should get:


Step 5:
Turn the cs, and score a diagonal line on each of the outer small squares:


If you wish to embellish your lid with eyelets, brads, etc. - this is the time to do it.

Step 6:
Put double sided tape on each of the small outer squares:


(put the tape from both sides of the diagonal line. I forgot to do it...)

Step 7:
Pinch all 4 corners and adhere inside.


Your lid is finished.

Step 8:
Adhere your photos and embellish the squares:


Step 9:
Put liquid glue (or double sided tape) on the inner square of the middle cross and adhere the small cross on the middle one. Then do the same on the inner square of the big cross and adhere the other cross on it:


You're done!

Here another exploding box I've made:


Now it's your turn to make this lovely exploding box. It's a perfect gift to give to those you love.... If you make one, please leave me a link in the comment section, so I'll be able to come and leave you some love.

Before you go, here's a reminder: Give your heart challenge at Simply create; Sketch challenge at Sketch Along Tuesday - Frosted Designs (my own sketch!!!); Red, Pink & White only at Fabulous Friday - Frosted Designs; Sketch challenge at Sketches In Thyme. So much fun around, come and join us!


Oh, and one last, but not least, thing before you leave... Here's a sneak peek to my new lo:


I will post it next Tuesday, with our new sketch challenge at Frosted Designs.

Thank you for visiting my blog. Stay warm and safe.

זו הדרכה להכנת קופסא מתפוצצת שהכנתי כמשימה של חברת צוות מעצבות בבלוג של Frosted Designs. ההדרכה עלתה שם כבר ביום ראשון האחרון, אבל היה לי שבוע מאד עמוס בעבודה, ולא הספקתי להעלות את ההדרכה כאן.
בהדרכה נתתי מידות גם בס"מ (עבורי זה היה החלק הקשה ביצירת ההדרכה - התרגום  לאינצ'ים....). העיקרון הוא מאד פשוט ואם ההסבר באנגלית לא נוח, אז אפשר להשאיר לי תגובה ואשמח להסביר גם בעברית.
האפקט של הקופסאות המתפוצצות פשוט מדהים. אין מישהו שפותח ולא מתלהב.

וההצצה היא לדף חדש שהכנתי, שאותו אעלה ביום שלישי, עם אתגר סקיצה חדש ב-Frosted Designs. נתתי גם תזכורת לשלל אתגרים בבלוגים בהם אני חברה. אני אשמח מאד אם תשתתפו בהם!

שבת שלום וחג משפחה שמח (איך, איך הפקיעו לנו את "יום האם"?!).

Caressings and smiles - lo for Sketches In Thyme


It's Team B's turn again at Sketches In Thyme, and this my take on this week's sketch. The photo is of my youngest, about 4 years ago, caressing a rabbit, smiling and having lots of fun.
Here's the sketch, from Sketchabilities:


I turned it to the opposite side, but otherwise kept it as it is.
I useds some chipboards, pleated ribbon and some buttons. I also painted a frame around the dp.
Here are some cloue-ups:


Now it's your turn to play with this sketch and share your layout with us at Sketche In Thyme.

Thanks for stopping by!

דף מעוצב שהכנתי לאתגר סקיצה ב- Sketche In Thyme. התמונות הן של בני הצעיר, מלטף ארנבת בפינת הליטוף באגם חי ביראון, לפני קצת יותר מ-4 שנים.
סובבתי את הסקיצה, כך שתתאים לתמונות שלי, ומעבר לכך נשארתי די צמודה לסקיצה. השתמשתי בצבע אקרילי לצבוע מסגרת לדפים המדוגמים, וכמה צ'יפבורדים, סרטים וכפתורים. האותיות הן של "תוצרת הארץ".

תודה על תשומת הלב, וחג משפחה שמח מחר!