Showing posts with label diy embellishments. Show all posts

Saturday, April 25, 2020

Use up those scraps! - two cards

We're nearly the end of April, and I'm almost done with my April Counterfeit kit. Although I used only one of the 12x12 pages, I used almost all the smaller papers and many of the embellishments (including my counterfeited ones!).
I run into two sketches which were just perfect to use more of my kit scraps, and made two cards.
The first card:
I rotated the sketch to the side, as I wanted to use this long 'thank you' die.
The circle is a handmade 'chipboard' that I was very happy to use here.
The second card:
Again, the circle is a handmade 'chipboard'.

Loooking again at the card, I might just add some black faux stitching to the edges of the pp.

Both cards go also for the 'All occasion' challenge at Krafty Chicks.

Thank you for visiting my blog. Your comments are much appreciated!


Monday, April 13, 2020

Good vibes only - Corona days notebook II

I loved my first Corona days notebook so much, that I decided to make another one, again using my April counterfeit kit.
For this notebook, I used pp for the inner pages, so I actually combined two of Keren Skubatch's tutorials - Here and Here.
I also adhered pp to the inner covers and used the extra of the spine to create two little pockets on each cover, where I added some tags.
On each page I added a spot to write, stickers and mini cards for decoration. Each page is designated for writing down ideas, thoughts, projects I want to make during the lockdown, wishes for the day after the crisis ends, etc.
So let's have a look in the inside of this springy notebook:
Opening - inside cover with tags and 1st page - my new daily routine:

Pages 2 & 3 - good things about this period (and yes, one of them is lots of crafting time!), and a page for work:
Pages 4 & 5 - 'I'm tired of...' and 'I took a moment to think':
Pages 6 & 7 - 'I miss...' for all the things that I don't have on this period and that I miss. 'It about time to...' for all the home projects that I never get to do, and now I have time/energy to do (anyone said something about organizing my craft room?):
Pages 8 & 9 - for all the crafting projects I want to make and finally have time to do.
Pages 10 & 11 - well, I think I want to make a lot of crafting projects, so I left another page for the list... The other page is 'I also want...' - for other leisure activities I want to do (tv series binge, watching movies that are on my list, books I want to read, home spa, etc.):
Pages 12 & 13 - things I MUST do, not necessarily I WANT to do, or LIKE to do:
Pages 14 & 15 - 'Something good is about to happen' - plans for the day after (haircut for sure!), and 'I'm prouod of myself' - all the things I managed to do during this period (from all the previous lists... one of them - have lots of patience...).
Page 16 & back cover - 'Moving on'... for returning to the old routine, and another small pocket with a tag.

Now, do you agree with me that ' Good vibes only', or what?
This notebook is a real 'mix 'em up', as I used here papers from different companies (DCWV, Carta Bella, Echo Park, WhiteRus), washi tapes, stickers from different companies, lots of stamps, punches, dies - you name it. Therefore I enter it to the current challenge at Little Red Wagon.
Thank you for visiting my blog. Your comments are much appreciated.

Saturday, April 11, 2020

Corona Days notebook no. 1

Determined to use my April Counterfeit kit, I made a simple notebook. I followed a great tutorial by a super talented crafter lady, Keren Skubach. 
Her tutorials are always so easy to follow and she has such creative ideas, so I suggest you to just scroll around her blog
I used a kraft cs, one piece of scrap from my kit and some of my handmade embellishments (the golden paper clip with the bow, the cluster embellishment with the flower and the punched butterflies). I added a washi tape and an arrow sticker, both from my kit, and that's it!
I kept the embellishments as flat as possible, to make it easy to write in the notebook.
This little notebook is intended to document my memories, thoughts and feeling from this chaotic period.

I must say that only looking at it, with the cheerful colors and the kind of garden design, makes me feel much better. Mission accoplished!
I would like to submit this notebook to the following challenges:
Time Out #159 - inspired by words:
The two words - garden and library - are in my project - a book of my inner garden.
C.R.A.F.T 552 - create your own embellishments
Simply Creat Too #159 - anything but a card

I hope you and your dears are all okay and safe!
Thank you for visiting my blog. I appreciate your comments very much!


Thursday, April 9, 2020

A different spring - my April Counterfeit Kit

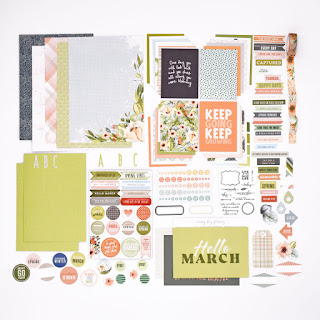
Counterfeit Kit Challenge blog has a beautiful Cocoa Daisy kits to counterfeit this month - Orchard Path kits. Here's the inspiration kit (part of it, as Cocoa Daisy has many kits in for this line):
Being home dew to the Corona Virus, I have plenty time to craft, so I joined the challenge!
I named my kit 'A different Spring', as this spring is really so different, and with the inspiration of  The 4 Questions we ask at Passover Seder, which was last night. Every Seder we ask 'Why is this night different from all nights?'. This time it had an additional meaning, as we all celebrated the holiday applying social distance, apposed to our usual habbit, which is to celebrate the Passover with the whole family.

As always, when I make my counterfeit kit, I start with the colors: apple green, pale pink, blush pink, mango orange, peach, coral, grey, pale blue, some gold black and a touch of red.
Then comes the patterns: floral, stripes, chevrons, scattered dots, lace circles in squares, plaid, scales.
Here're the 12X12 papers in my kit:
I have here Carta Bella, Altair Art, DCWV and Echo Park. The scattered dots paper is foil gold, but it doesn't show in the photo.
I wanted to use up more of my 6x8 & 6x6 papers:
Papers are from Simple Storeis, Carta Bella, WhiteRus.
Another goal was to use up scraps, large enough for matting, cards and making more embellies:

I added stickers, enamel dots (lots of them..), chipboards, Prima's flowers, washi tapes and AAll & Create stamp set:
Last, but certainly  not the least, are my counterfeited items. There are so many embellishment in the kits, but what my eys were drawn to was the large golden clip with the peach ribbon bow, and that was the first item to counterfeit. I also made some 'chipboard' circles, labels, tabs, floral embellishmet and lots of butterflies:
And here's again the full kit:
I'm looking forward to using my kit!

Friday, November 8, 2019

My November Counterfeit Kit

I loved the inspiration kit for November at Counterfeit KIt Challenge blog, with a very beautiful color palette. 
The inspiration kit is from a Dutch club:
I used Lisa's tip to use Coolors.Co to play with the colors, and this is what I came up with:
And this is my kit, first papers side A (along with solid cardstock in coordinating colors):
Papers side B:
I love the houses and the coffee cup to go images, and especially the watercolor strocks paper, so I counterfeited them. I played with Lindy's Gang products and made my a paper with strocks of the kit colors. I stamped a house stamp, and colored it with the same colors I already made, as for the coffee cups, I found this digital stamp, and then playes on my pc with the colors:
Finally - the embellishments:


Lots of buttons, some wood veneer embellies, stickers, alphas stickers, flair buttons and chipboards.
I didn't include flowers, stamps and enemal dots, as I will use them enyway as I make my projects.
I love my kit and hope to use it as much a posiibble!
Thank you for visiting my blog. I appreciate your comments very much!

Saturday, October 19, 2019

A folder with a wing for a man

A very good friend of mine celebrated his birthday, and I've made him a folder with a wing.
I've made the folder from start to finish, with chipboards for the basis, wrapped with black efalin paper (I prefer wrapping with efalin paper, rather than with cardstock, as the cs tend to break along the edges and the spine, while the efalin paper does not).
I use my October Counterfeit kit for this folder, and it's already my 5th project, using my kit, and the 6th is almost done!
The folder measures 8.5"X6.25", in side it has an accordion envelope and a pen holder. I also put inside a notebook pad, which can be replaced, as there's a bellyband to hold it's back in place.
Here're some close-ups:

Thank you for visiting my blog. I appreciate your comments very much.

Wednesday, October 16, 2019

Autumn - a mixed media layout

We've had some strong thunderstorms with rain, and it's quite unsual here to have that strong thunderstorms. On the other hand, it's very hot too.  Autumn, anyone?
So no wonder my new layout is all about autumn. The photos of my youngest, were taken 5 years ago, on a stroll we had in a lovely place, and as you can see, it was all autumn around.
I was inspired by the fab moodboard at Mixed Media Place:
I took inspiration from the autumn photos - the acorns, the mashroom, the falling leaves.
I must say, this layout was a Lindy's festive for me. I used so many of thier products to achieve the colors I wantd for my layout.
I started by tearing some of the papers and distressing the edges with TH Tea Dye distress ink. Then I  layered the papers and splattered with Oktoberfest Orange shaker and Antique Bronze shaker:
I stamped with 49 and Market stamp (Pascale writing), using Ranger's Coffee archival ink here and there:

For the redish-brwon leaves, I mixed some Lindy's shakers: Aged Copper, Antique Bronze, Autumn Maple Crimson, Cowabunga Copper and Oktober Orange. I added from each shaker till I got the right color I wantd. Then I die cut the leaves.
For the brownish-orange leave, I mixed Lindy's flat sprays: Luscious Lime, Queen of Hearts Red and Mango Mania I also added Yellow Rose of Texas starburst spray. I made sure to color both sides of my watercolor paper, and die cut another shapes of leaves.
As for the mesh die cut, it started as an experiment for a previous project (which you can see HERE) - I used the same ebmossing powder, Terra Cotta Rust, once on a white cs, and then on a black cs. In the previous project I ended up using the one on the white cs, as the other one was too dark for that project:
I was left with the darker version and when I worked on this layout, I thought it's a perfect match:
I really like the different looks of using Lindy's products on white or black background.
I adhered the photos and made two clusters, using Petaloo flowers with my diy leaves.
On the clusters I splattered Lindy's Grag a Guy Gold spray, to get the gold look:


I just LOVE how it turned out!
I finished up with sparkly alphas and enamel dots:

Thank you for visiting my blog. I appreciate your comments very much.