Tuesday, June 14, 2011

The Pilots Mountain - lo


It's Tuesday again and it means a new sketch challenge at Frosted Designs, Sketch Along Tuesday.

This time it is a two pagers sketch, designed by Debbie:


It was a real challenge for me, and I must say at first I thought I'd make only one side of it (the challenge allows it), but then the muse came to me, and finally I made the two sides.

The photos are from a trip we did  on Passover vacation last April, in a place called "The Pilots Mountain". We took the road down the mountain and boy!, it was very steep! The boys run forward and I was way behind... There was a beautiful bloom, so springy.

Now it's your turn to play with this sketch. You can make it double pager or make only one of the sides, as long as we can see the sketch in your layout.

Thanks for stopping by!

כפולה שהכנתי לאתגר הסקיצה ב - Frosted Designs. זה היה אתגר משמעותי עבורי, מאחר שבד"כ קשה לי עם כפולות. הישועה באה מקרין, כשנפגשנו ספונטנית לערב יצירה משותף,  ובעזרתה הצלחתי להתניע את המוזה. באותו ערב כמעט סיימתי את הדף הראשון (עם מסגרת האובלית), ואחריו הדף השני כבר זרם בקלילות. קרין, תודה רבה על ערב מהנה ופורה!
התמונות הן מטיול שעשינו בהר הטייסים בחופשת פסח האחרונה. ירדנו במדרון ההר התלול, והילדים פשוט רצו קדימה, בעודי משתרכת לאיטי מאחור....

תודה על תשומת הלב!

Friday, June 10, 2011

Serious Me - lo


A new vintage laout of mine, with a photo of me, when I was about 6 months.
This lo goes for the challenge of shabby chic at Basic Grey (the kraft paper and the dp are all BG), and for the challenge at Scrapbookers Anonymous, which was to use at least 3 sheets from mini paper pads. Here are the BG dp I started with:


Eventually, I didn't use the green one, only the other 3 dp.
I'm also entering it to the 'lots of something' challenge at Scrap & Stamp Saturday (lots of distressing and layers, with a script stamp and stamping on the corners).
Here are some close-ups on the tearing, distressing, the bird cages,  leaves and lace bird:


Thanks for stopping by!

דף וינטאג' חדש שהכנתי, עם תמונה שלי בערך בת 6 חודשים. הרבה יישון, דפי תווים, קריעות, ועלים.

תודה על תשומת הלב ושיהיה סופ"ש נפלא!

Homemade chipboard - a tutorial הדרכה מצולמת להכנת צ'יפבורדים תוצרת בית


I've been asked several times how do I make my 'homemade chipboards', so I thought I would share with you this very very simple thecnique.
It's easy to make, cheaper than buying chipboard, it's available in any shape and color you want, and on anytime you need it, not to mention that it's a recycling project.
Of course it would probably be less 'perfect' than those  you can buy, but I really don't mind it. I just like my imperfection.

So let's get to work!

You'll need:
A cardboard (my all time fav is cereal box)
A pencil
A cutting tool  (can by scissors, crafters knife, etc.)
Some acrylic paint
A brush
Diamond Glaze (optional, only if you wish to give the 'chipboard' a shiny look. you can also use glitter powder or anything else you desire to give a beautiful coat)
optional - a stencil or a template for the pattern you wish to make
Step 1:
Draw your pattern on the cardboard
Step 2:
Cut the pattern, using your cutting tool, and take it from the cardboard.
Step 3:
Paint the pattern with the acrylic paint and let it dry completely (I did it twice, for better covering of the paint).
Step 4 - optional:
If you wish to give it a shiny look - spread Diamond Glaze generously.
If you wish it to glitter - spread any kind of liquid adhesive, and then put some glitter powder.
you can also stamp it with stamps
You can leave it as it is, for a mat look.


For this chipboard I wanted a shiny look, so I used Diamond Glaze:
Let it dry completely. This is what you should get:
And here's an example of a sparkly look:
You're done! See, I told you - it's simple and easy.
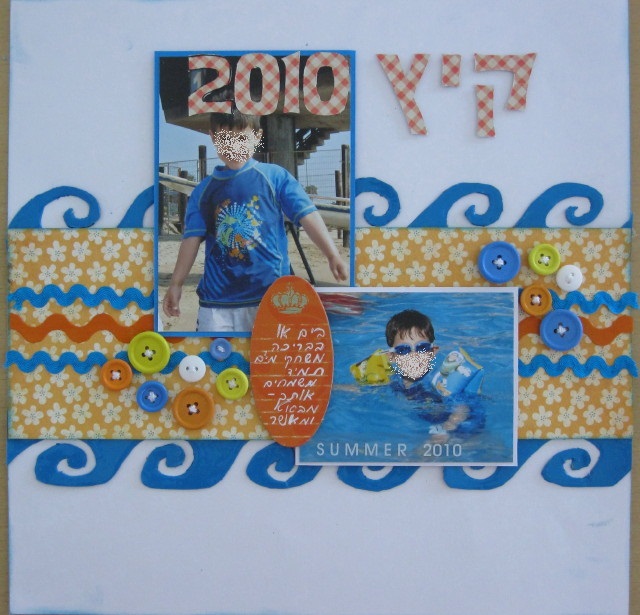
Here's the finished layout:
And you can give it 'double duty' if you use the 'chipboard' as a stencil for masking, inking etc. Before I adhered it to my lo, I used the chipboard for making a frame on another cs, for future use:
And here are some examples of using this technique on my layouts:


I hope you'll find this tutorial useful for you, and that  you'll give it a try.
I would love to read your comments and if you make some homemade chipboards, I would be happy if you link it to this post, so I'll be able to visit you and see.
Get creative....


הדרכה מצולמת להכנה קלה ופשוטה של 'צ'יפבורדים' תוצרת בית. אופציה נהדרת ליצירת קישוטים תוצרת בית, תמיד זמין בזמן, בגודל ובצבע שאתן רוצות. אמנם זה לא יוצא מהוקצע כמו צ'יפבורד קנוי, אבל זה לא חייב להיות מושלם... וזה שלנו, יצירתי ופרוייקט מיחזור נפלא.
החומרים:
קרטון כלשהו (אני משתמשת בקרטונים של אריזות דגני בוקר)
עפרון
מכשיר חיתוך כלשהו (מספריים עדינים, סכין חיתוך מעוגל - מה שמתאים לכן)
צבע אקרילי
מברשת
אופציונלי -דיאמונד גלייז; אבקת נצנצים.
שלב 1:
לשרטט על הקרטון את הדוגמא הרצויה. אפשר לשרטט ביד חופשית או להשתמש בסטנסיל/שבלונה. אגב, הבסיס של דפי צ'יפבורדים קנויים, אחרי שמוציאים מהם את הצ'יפבורד, הם אידאליים לכך, וכך אפשר להכפיל ולשלש את השימוש בדף הזה.
שלב 2:
לחתוך את הדוגמא מתוך הקרטון. בהרבה מקרים אפשר להשתמש גם בנגטיב, כמו שאני עשיתי במקרה הזה. 
טיפ - מהניסיון שלי, העבודה עם סכין חיתוך עגול קלה יותר מאשר עם מספריים, וגם  משאירה שוליים יותר נקיים.
שלב 3:
לצבוע את הדוגמא בצבע אקרילי. אני צבעתי בשתי שכבות, כדי לתת כיסוי טוב יותר של הצבע. לתת לצבע להתייבש לגמרי (צבע אקרילי מתייבש מאד מהר יחסית, כך שזה לא שלב שלוקח זמן רב).
שלב 4, אופציונלי - הכיסוי:
אם רוצים מראה מבריק - למרוח שכבה נדיבה של דיאמונד גלייז ולתת לזה להתייבש.
אם רוצים מראה נוצץ - למרוח שכבה דקה של דיאמונד גלייז (או של כל דבק נוזלי אחר), ולפזר אבקת נצנצים (אח"כ לתפוס בעדינות ולנער מעל דף/קופסא. האבקה נתפסת רק למקומות בהם יש דבק ואת השאריות מחזירים לקופסא של אבקת הנצנצים).
אפשר גם להחתים על הצ'יפבורד הצבוע (לאחר שהתייבש, כמובן). זה הולך נהדר עם חותמות של כיתובים, דוגמאות סלסולים וכיוצ"ב.
והנה דוגמא לכיסוי מנצנץ:
אפשר גם, כמובן, להשאיר את זה כמו שזה, למראה מט.

זהו!! יש לכן צ'יפבורד תוצרת בית.
והנה הדף במלואו, עם הצ'יפבורדים:
הנה כמה דוגמאות מזמן האחרון, בהן השתמשתי בצ'יפבורד תוצרת בית:

שימוש נוסף בצ'יפבורד-  לפני הדבקה על הדף המעוצב, כשבלונה. במקרה הזה, השתמשתי בו כדי להכין מסגרת בדף אחר, בטכניקת מסיכה עם שימוש בדיו דיסטרס:

פרוייקט קליל ופשוט, והאמת היא שגם לא לוקח זמן רב (את שני הצ'יפבורדים הכחולים הללו הכנתי תוך פחות משעה, כשתוך כדי גם הכנתי ארוחת בוקר לילדים, שטפתי כלים ונדמה לי שעוד אי אלו דברים...).
אני מקווה שההדרכה הזאת תהיה שימושית עבורכן. אני אשמח מאד לקרוא תגובות, ואם תשתמשו בטכניקה הזאת ותכינו צ'יפבורדים תוצרת בית משלכן, אני אשמח מאד אם תשאירו לינק בתגובות, ואבוא לבקר ולראות.

שיהיה סופ"ש נפלא!

Thursday, June 9, 2011

Bikkurim - lo


A new sketch challenge at Sketches In Thyme, with a fab sketch:


And there's a great prize you can win, a $ 20 gift certificate to The Paper Trail! They have awesome kits, you should go and check that store!

This week we had Bikkurim holiday.  At the kindergartens, they have a lovley ceremoney, where the kids brings baskets full of fruits and vegetables, mimic to the old custom of bringing the first growth to the Temple.
On this lo, the photo is of me, I think at the age of 3, bringing my basket.

I used white Bazzil cs, music notes sheet, October Afternoon dp, lace, music notes ribbon, leaves ribbon, red polka dots ribbon, twine, a button and preals. I made the crochet lace frame my self, and used TH distress inks.
Here are some close-ups:


And it also goes for the following challenges:
texture - one stop craft
use something new - ssic (the music notes sheet is from an old book, but was bought by me last week!)
vintage appeal - getting cricky
distressing - #29 cic
distressing - everybody art
monochromatic - kort-o-mania

Thank you for taking the time and visiting my blog.

ברוח חג השבועות, הכנתי את הדף הזה, עם תמונה שלי בטקס הבאת ביכורים בגן, נדמה לי שהייתי אז בת 3....
הדף הוכן לאתגר סקיצה ב-Sketches In Thyme, ולמרות שהשבוע הוא לא התור של הקבוצה שלי, כל כך אהבתי את הסקיצה, והצטרפתי.
את מסגרת הקרושה סרגתי לקארדסטוק לבן, שאת השוליים שלו 'ליכלכתי' בדיו דיסטרס. השתמשתי גם בדף תווים שגם הוא עבר יישון מאסיבי, תחרה, סרטים, כפתור ופנינים. האותיות הן 'תוצרת הארץ' ממסטיקים.
תודה על תשומת הלב!

Wednesday, June 8, 2011

Summer 2010 - lo קיץ 2010


With hot summer already here, the color challenge at Design Dollies was just on time - orange, yellow, aqua blue and white - for my youngest's photos from last summer.

I used the sketch from ScrapWithV:


The 'waves' were made from cereal box, that I painted with acrylic paint and added Diamond Glaze on it. If you wish to know how I've made them, here's the tutorial I've made. Here are some close ups:


The cs is Bazzill, the dp is My Mind's Eye, the title (which says in Hebrew: "Summer 2010") was made with stencil and Fancy Pants' dp, some ric rac ribbon, ric rac cs painted with orange acrylic paint, chipboard and buttons.

I'm entering this lo also for the following challenges:
summer - pile it on
all about the males - lady bug crafts
here comes the summer - a spoon full of sugar
beach theme - paper cutz
for the guys - the paper variety
orange - dysu
anything goes - papertake weekly
around the house - scrapfit (I used cereal box to make the 'waves' embellishment)


And here's a sneak peek to my new layout, I'll be posting tomorrow, with the new sketch challenge at Sketches In Thyme:


From this small sneak peek you can tell that it's something totally different than my Summer lo..... Please come back tomorrow to see it fully.

Thanks for stopping by!

דף חדש, באווירת ובצבעי הקיץ. התמונות הן של צעיר הבנים מהקיץ שעבר, גם בחוף הים וגם בבריכה.
קישוט הגלים הוא שוב צ'יפבורד תוצרת בית (בקרוב ההדרכה...).  האותיות גזורות עפ"י שבלונה של אותיות 'קסם שימושי' מנייר מדוגם של Fancy Pants. הדף המדוגם הוא My Mind's Eye והקארדסטוק הוא Bazzill.
שמתן לב שלאחרונה התאהבתי בקונספט של דפים לבנים? אז מחר אעלה עוד אחד לבן, לכבוד חג שבועות. למעלה יש הצצה קטנה אליו. הוא בהחלט שונה מדף הקיץ הזה...

עוד יום עבודה אחד (שגם הוא יהיה רק חלקי, מאחר שהילדים עדיין בחופש), ושוב סופ"ש!!!!

תודה על תשומת הלב.