
A tutorial I've made to show you how I've made my 'water lillies'.
הדרכה מצולמת איך להכין פרחי חבצלות מים מפאנצ'ים.
supllies:

white cs; yellow cs; flower punches in 4 different sizes and shapes, one of them with a 'sun' shape; pencil/paint brush; glue.
חומרים:
קארדסטוק לבן וצהוב; 4 פאנצ'ים של פרחים, שונים בגודלם ובצורתם, כשאחד מהם בצורת 'שמש'; עפרון/מברשת ציור; דבק.
step 1:

punch the white cs with 3 different punches (one for the sun shape).
punch the yellow cs with the smallest flower punch.
שלב 1:
פנצ'צ'ו 3 פרחים לבנים (אחד מהם בצורת 'שמש') ופרח אחד צהוב (הצהוב הוא בגודל הקטן מבין הפרחים).
step 2:

wet the large white flower. I wanted it to be in light yellow color, so I misted it. while it is still wet, crumple it. let it dry completely.
שלב 2:
הרטיבו את הפרח הגדול ובעודו רטוב, מעכו אותו לכדור קטן. אני רציתי שהוא יהיה בצבע צהבהב בהיר, אז התזתי עליו גלימר מיסט צהוב. תנו לו להתייבש לגמרי.
step 3:

open the crumpled flower very gently so you don't tear the petals.
שלב 3:
פתחו את ה'כדור' בעדינות רבה, כדי לא לקרוע את עלי הכותרת.
step 4:


with the top of a pencil or the other side of a paint brush, work in circles on the other two punched flowers, so thier petals will turn a little upwards.
שלב 4:
בעזרת הקצה של העיפרון או מברשת הציור, עבדו במעגלים על מרכז הפרחים המפונצ'צ'ים, כך שעלי הכותרת יתקפלו מעט למעלה.
step 5:


fold upwards the petals of the smallest flower (the 'sun' shaped). it is so small so I used toothpick to do it. roll it between your fingers, to ensure that the petals will stand upwards.
שלב 5:
קפלו את עלי הכותרת של הפרח הקטן ביותר, זה שבצורת שמש, כך שהם יעמדו בניצב לבסיס הפרח. גלגלו את הפרח בעדינות בין אצבעותיכם, כדי לקבע את עלי הכותרת למעלה.
step 6:


layer the flowers, from the biggest to the smallest.
שלב 6:
ערמו את הפרחים זה על גבי זה, החל מהגדול שבהם ועד לקטן בצורת השמש.
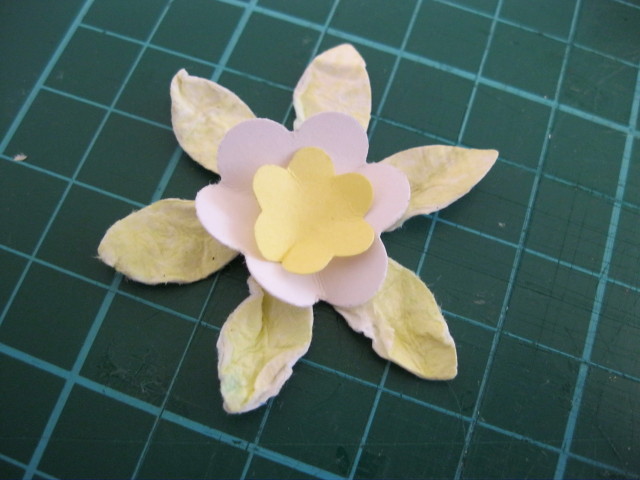
That's it! this is how it should look in the end:
זהו! הפרח מוכן וכך הוא אמור להיראות בסופו של דבר:

And here are the many 'water lillies' on my layout:
וכך נראות 'חבצלות המים' שלי בדף מעוצב שהכנתי:

I hope you'll find this tutorial useful for you. If you use my tutorial, please leave me a comment with a link. I'd love to come and look at your flowers.
אני מקווה שההדרכה הזאת תהיה שימושית עבורכן. אם נעזרתן בהדרכה הזאת כדי להכין 'חבצלות מים', אשמח אם תשאירו לי תגובה עם לינק לעבודה שלכן, כדי שאוכל לבוא ולהתפעל!
1 comment:
משגע, איזה יופי!
ואת הדף הזה אני מאד אוהבת!
Post a Comment