Monday, February 26, 2018

How to highlight a sentiment on your card - for Robin's Nest

Hello dears,
Today it's my turn on the Robin's Nest Blog, and this time I share a way to highlight a sentiment on your card with Robin's Nest dew drops.
Hop over to Chattering Robin's blog to see my 'how to'.
I've used my Feb Counterfeit Kit for this card, with Altair Art papers. I also made some splatters with Lindy's Stamp Gang sprays (Cotton Candy Pink, Chateau Rose, Envey With Green and Aloha Avocado).
Meanwhile, you can enjoy the close-ups:


I'm entering this card for the More Than Words mini challenge, which asked for the word "True":
Thank you for visiting my blog. I appreciate your comments very much.

Saturday, February 24, 2018

A mini album for a sweet girl - Altair Art DT assignment

Hello dear crafty friends,
Today it's my turn on the Altair Art blog, and I share a mini album I've made for a very sweet girl, who turned 12 years lately.
All the patterned papers I've used are from Altair Art (full list is in the end of this post).
The mini album measurements are 4.5" X 6.5" X 2.5", it has 5 pages and can hold more than 30 photos.
I have lots of flaps, inserts, mini booklets and a pocket.
I've use my Feb Counterfeit Kit for this album.
For the decoration I've used Lindy's Gang sprays, magical shaker and embossing powder (Alpine Ice Rose Pink spray and shaker, Chateau Rose, Wild Honeysuckle Coral, Aloha Avocado, Cotton Candy Pink, Oom Pah Pah Pink ep and Whale Watch Blue).
I also used some Robin's Nest dew drops, and DIY enamel dots, wood veneers, I am Roses flowers (7 different flowers on the front cover), foam die-cuts and fussy cut butterflies from Altair Art papers.
Here are the spreads and some close-ups:


I would like to enter this mini album to the flollowing challenges:
Lindy's Gang Feb mood board
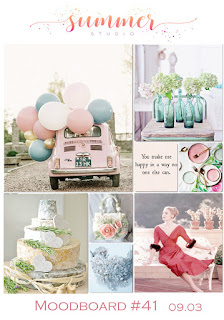
Summer studio moodboard no. 41:
I was inspired by the soft pastel colors and the flowers.
Pile it on - 3D embellishments
Mini Album Makers Feb challenge

I am Roses Feb challenge anything goes
Thank you for visiting my blog. I appreciate your comments very much.

Thursday, February 22, 2018

A paper basket tutorial

Hello dear crafty friends,

Today I have an easy peasy tutorial for you, how to make a paper basket.
I've made my tutorial with a 6"x6" paper, but you cand easily adjust it to any size you wish.

1st step:

Take a 6x6 pp (either a one-side or double sided), and score it at 2" and 4".

2nd step:

Rotate the paper 90 degrees, and score again at 2" and 4".
You should end up with a 9x9 squares, each one measures 2"x2".

3rd step:
Cut the middle squares (upper and lower) on both sides of the square.

4th step: 
Distress the edges with distress ink.

5th step:
Put some adhesive along the outer sides of the middle square, and on the inner corners of the 2 nearby squares.

6th step:
Adher both corners to the middle square, so they laps each other. Do the same on both sides.

7th step - the handle:
Take a cs 8"x1.5" and use a border punch on both sides (make sure to line up the pattern on both sides).

8th step:
Adhere a thin strip (8"x3/8") in the middle of the punched strip.

9th step:
Adhere the handle strip on both sides of the basket.

You can decorate your basket as desired.

I hope you'll find this tutorial usefull.

Thank you for stopping by!

Thursday, February 15, 2018

Selfie (families are forever) - Stuck?! Sketches Feb 15th reveal

 Today I would like to share with you a new layout I've made for Feb 15th reveal at Stuck?! Sketches.
This is the wonderful sketch, designed by Laura Whitaker:
I turned the sketch on the side.
I used my Feb Counterfeit Kit for this layout, with the beautiful paper from Altair Art.
I created some texture with modeling paste and stencil, and then added some colors with Lindy's Gang sprays - Sassy Sapphire & Cotton Candy Pink. I also used this sprays plus Silent Night Silver and Creme Brulee Cream to add splatters all over.
Stamping with Kaisercraft's stamps, fussy cutting from more beautiful papers from Altair Art and some DIY enamel dots, flair button, doily and homemade resins - all to embellish around the frame and the photo of the 3 of us. I also used some Robin's Nest dew drops. I think they add so much to my lo
I've used some Creative Embellishments chippies - the frame and, diamond shape and the 'Selfie' title. All of the chippies were coverd with white gesso, and then got several coats with Lindy's Gang embossing powders (King Midas Gold & Desert Moon Turquise for the title and the diamond shape; Cosmic Blue Violet and Silver Moon Sapphire for the frame).
Here are some close-ups on the details:


I would like to enter this lo to the following challenges:
More than Words - Forever & Heart
I was inspired by the theme of love forever and the heart shape created by the couple's hands. I thought of the begining of a family and that families are forever, hence the sentiment I've placed on the right side of my lo.
Creative Embellishments - moodboard plus hand writing.
I was inspired by the shabby chic/vintage design and colors and by the flower. I was also inspired by the multi layers and so is my design. I also have hand writing both on the stamped sentiment and the foam die-cut.
Summer Studio - moodboard #41:
I was inspired by the pastel colors, with the combination of pink, pale blue, turquise, pale yellow and a touch of glod. The flowers were also an inspiration.
I Kropka - challenge #54 LOVE. This layout is all about my love for my boys, my family.
Thank you for visiting my blog. I appreciate your comments very much.